Two Attempts Max: Remove Scuff Marks on Walls in Melbourne
Start with a dry microfibre cloth and firm, circular buffing. Most scuff marks are just a smear of shoe rubber or plastic sitting on top of the paint, not a stain baked into it, so they lift off with friction alone. If that doesn’t shift it, move to a barely damp microfibre with a drop of dishwashing liquid, then baking soda paste or rubbing alcohol for anything stubborn. Stop after two careful attempts. If the paint dulls or the mark won’t budge, it’s time for a touch-up or a professional clean, not a third scrub.
TL;DR:
- Use dry microfibre buffing initially, as many shoe-sole marks lift with just friction and pose no risk to the paint finish.
- Mild cleaning steps like warm water with dish soap or baking soda paste are effective for stubborn scuffs, but should be limited to two careful attempts.
- The type of paint finish significantly affects cleaning, with flat and matte surfaces being more delicate and prone to shininess if scrubbed aggressively.
- For deep stains or extensive damage, professional wall cleaning can prevent further harm and is preferable when DIY methods could cause issues.
- Always test cleaning methods on hidden areas first and stop after two attempts to avoid damaging the paint or creating visible patches.
Table of Contents
- How to remove scuff marks on walls fast: the checklist
- Step-by-step methods for every type of wall scuff mark
- How does paint finish affect which cleaner to use?
- When should you stop cleaning and just touch it up?
- Preventing scuff marks before they happen
- When is it time to call in a professional wall cleaner?
- What Roney thinks homeowners get wrong about scuff marks
- Book a professional wall clean with Com
- Where this advice comes from
- Sources
How to remove scuff marks on walls fast: the checklist
Work through these steps in order. Skipping straight to the harshest method is how a scuff turns into a shiny bald patch.
- Buff with a dry microfibre cloth. Use small circular motions for 20 to 30 seconds. Rubber and plastic scuffs (the classic shoe-heel streak) often disappear at this stage with zero risk to the paint.
- Switch to a barely damp cloth. Warm water only, wrung out until it’s nearly dry, then repeat the circular motion.
- Add a drop of dishwashing liquid. Mix into the damp cloth for grease or dirt the water alone won’t shift.
- Try baking soda paste for rubber marks. A small dab, worked gently, handles marks that survive step 3.
- Use rubbing alcohol for ink or marker. Dab and let it sit rather than scrubbing.
- Melamine sponge as the last resort. Cut it into quarters, use short passes, and check the surface every 10 seconds so you catch sheen changes before they spread.
Step-by-step methods for every type of wall scuff mark
Each method below sits on a scale from gentlest to most aggressive. The goal is always to use the weakest method that actually works, because every step up that ladder carries more risk to the painted surface.
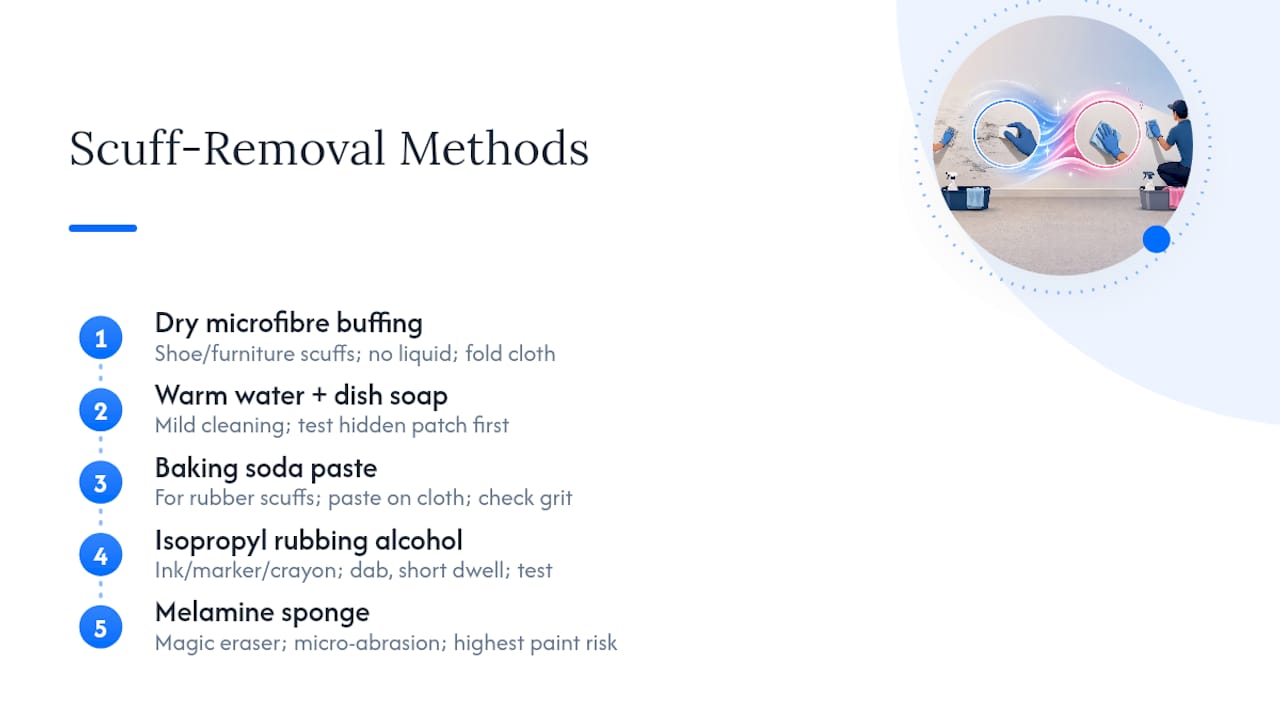
Dry microfibre buffing is where every scuff removal job should start. Fold the cloth into quarters, buff in one direction rather than scrubbing back and forth, and check the cloth itself. If it’s picking up a grey or black residue, the scuff is transferring and you’re close to a full removal. A lot of shoe-sole marks and light rubbing from furniture come off entirely at this stage, no liquid required.
Warm water and dish soap is the next rung up. Mix a small drop of dishwashing liquid into a cup of warm water, dip the microfibre cloth, then wring it out hard. It should feel barely damp, not wet. Mild soap and warm water is the recommended first wet cleaning method before you reach for anything stronger, and it’s worth testing on a hidden patch first to check the finish handles it. Work in small circles, then follow with a dry cloth to buff and remove any soap film.
Baking soda paste handles the marks that laugh off soap and water, particularly rubber scuffs from shoes, chair legs, or skateboard wheels. Mix roughly one tablespoon of baking soda with just enough water to form a paste the texture of toothpaste. Applying the paste to a cloth rather than directly onto the wall reduces the risk of grit scratching the paint, so load a damp cloth rather than smearing it straight onto the surface. Work in 15 to 20 second bursts, checking progress each time, then wipe the area with a clean damp cloth to lift any leftover residue.
Isopropyl rubbing alcohol is the pick for ink, marker, or crayon, which none of the soap-based methods touch well. Dab a small amount onto a cotton pad or the corner of a cloth and let it dwell on the mark for a few seconds rather than scrubbing straight away. A short dwell time gives the alcohol a chance to break the ink down before you wipe, which is gentler on the paint than aggressive rubbing. Test an out-of-sight spot first, and be cautious on glossy finishes if you’re not sure how they’ll react.
Melamine sponge (the “magic eraser” style) is genuinely last on this list for a reason. It works through micro-abrasion, essentially sanding the mark away at a microscopic level, and can burnish or strip paint if you get carried away with it. Cut the sponge into quarters so you’ve got more control, dampen it slightly, and use short, light passes rather than pressing hard. Check the sheen after every pass.
A few other household fixes are worth knowing. Non-gel white toothpaste works almost identically to baking soda paste as a mild abrasive. Shaving cream can lift greasy marks in the same gentle way soap does. Vinegar gets recommended a lot online, but it’s acidic and can dull certain paint finishes, so it belongs well down the list after milder options have failed, not as a first move.
Pro Tip: Keep two cloths on hand: one that stays completely dry for buffing, and a second dedicated to anything damp or soapy. Mixing them up leaves a faint wet mark on top of the scuff you’re trying to remove, and now you’ve got two problems.
How does paint finish affect which cleaner to use?
Not all paint reacts to cleaning the same way, and this is where a lot of DIY attempts go wrong. Paint sheen runs on a scale from flat and matte through to eggshell, satin, semi-gloss, and full gloss, and tolerance for scrubbing rises as you move up that scale.
- Flat and matte finishes are the most porous and delicate, common in bedrooms and ceilings, and the most likely to develop a shiny patch if you scrub too hard.
- Eggshell and satin sit in the middle, handling a damp cloth and mild soap comfortably.
- Semi-gloss and gloss, typically used in kitchens, bathrooms, and trim, tolerate scrubbing and stronger cleaners far better.
Flat and matte finishes are more porous and can develop shiny spots when scrubbed, while gloss handles it without much fuss. Run a quick two-step test before you commit to a method: buff a hidden patch with a dry cloth, then repeat with a barely damp one, and watch for any change in sheen. If the surface starts looking shinier or patchier than the paint around it, stop and stick to dry methods only for that wall. Many interior walls in Australian homes are painted in flat or low-sheen finishes, which is exactly why testing first matters more than it seems.
When should you stop cleaning and just touch it up?
Two attempts is the limit. Two careful attempts is a widely recommended practical limit before you risk further damage, and pushing past that usually does more harm than the original scuff. If a mark has actually taken the paint off down to the plaster or substrate underneath, no amount of cleaning will fix it. That’s a touch-up job.
- Let the wall dry fully before touching it up, even if it looks dry already.
- Use a small artist’s brush rather than a roller for a patch this size, dabbing rather than dragging.
- If your touch-up paint is newer than the paint on the wall, thinning it slightly can help it blend with a wall that’s slightly aged and oxidised.
- Feather the edges outward so the patch fades into the surrounding paint instead of leaving a visible square.
- If the mark is a stain rather than a scuff (nicotine, water, texta bleeding through), a shellac-based primer first stops it reappearing through the new coat.
Preventing scuff marks before they happen
The cheapest fix for scuff marks is never having to remove them. A packet of self-adhesive felt pads costs a few dollars and stops chair legs, bar stools, and side tables grinding marks into the wall every time they’re bumped or pulled out. Check them every six months or so, since felt wears thin and flattens with use.
- Stick felt pads on the base of any furniture that sits against or near a wall.
- Fit clear corner guards or adhesive bumpers at high-traffic points like hallway corners and stairwells.
- Set up a shoe-off zone near the front door to cut down on the dirt and rubber that ends up on walls in the first place.
- Wipe skirting boards and lower wall sections with a dry cloth every few weeks so grime doesn’t build up and bond to the paint.
Pro Tip: If you’ve got kids or a dog that likes to lean on walls, put felt guards on door handles and light switch plates too. Those are the two spots that collect scuffs and fingerprints faster than anywhere else in a room.
When is it time to call in a professional wall cleaner?
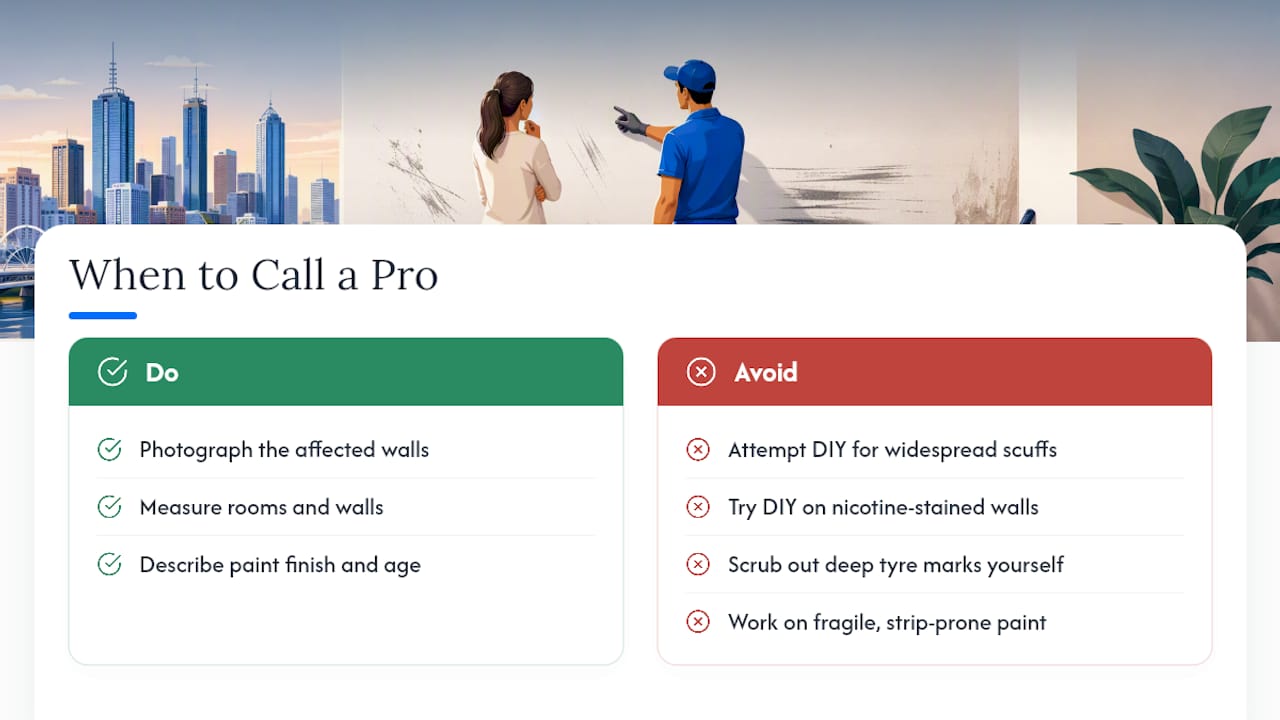
DIY methods handle isolated scuffs well, but some situations sit outside what a cloth and a bit of baking soda can fix. Widespread scuffing across multiple walls, age-related nicotine staining, deep-set tyre marks from prams or bikes, or a paint finish that’s already fragile and at risk of stripping are all good reasons to bring in a professional rather than risk making it worse.
A professional wall clean typically uses purpose-built equipment and eco-friendly, chemical-free solutions applied by insured technicians who know how to read a paint finish before they touch it. That matters most in rental properties, where a botched DIY attempt can turn a $30 bond deduction into a full repaint. If you’re weighing up your options, Com’s wall cleaning service is worth comparing against a weekend of scrubbing.
Before booking, take a few photos of the affected walls and measure the rooms involved. Most quotes come together faster and more accurately when you can describe the paint finish, the age of the paint job, and roughly how many walls need attention.
What Roney thinks homeowners get wrong about scuff marks
Most guides treat scuff removal as a chemistry problem: find the right cleaner and the mark disappears. That’s backwards. The real skill is restraint, knowing when to stop rather than knowing what to spray on next.
The conventional advice on this topic tends to jump straight to melamine sponges because they work fast and look satisfying in a before-and-after photo. What gets glossed over is that speed comes from abrading the paint itself, not lifting the mark off it. On a flat or matte finish, that’s a trade you’ll regret the moment you see a duller patch under the window light.
If there’s one thing worth prioritising, it’s the two-attempt rule. Not because two is a magic number, but because it forces you to actually assess the damage before you escalate. A scuff that survives a dry cloth and a damp one with soap is usually telling you something. Either it’s not a scuff at all, or the paint underneath has already started to give way. At that point, a small touch-up costs less time and looks better than a third round of scrubbing ever will.
— Roney
Book a professional wall clean with Com
Com handles wall cleaning and wall washing across homes and offices using eco-friendly, chemical-free methods and insured, trained technicians, which means you skip the guesswork on paint sheen entirely. This option makes the most sense when scuffing covers several walls, when you’re prepping for an end-of-lease inspection and can’t risk a DIY mishap, or when you simply don’t have a spare afternoon for buffing and baking soda paste.

The team assesses the paint finish on-site before touching anything, so there’s no risk of turning a matte wall into a patchwork of shiny spots. If time is the real issue, this is also worth pairing with an end-of-lease clean if you’re moving out and want the whole property covered in one visit rather than booking separate jobs.
To get a quote, send through a few photos of the marked walls and the room dimensions. Book online through the Agecare Carpet Steam clean page or get in touch directly to arrange a time that suits.
Where this advice comes from
The removal methods and cautions in this guide draw on paint-care guidance from Sherwin-Williams, practical how-to notes from Advance Painting, and finish-specific removal advice from D and G Flooring. Paint sheen guidance comes from Rolling Strokes, and surface-cleaning tips for painted interior doors from One Day Doors & Closets translate well to smaller wall areas. Always test a hidden patch first and follow your paint manufacturer’s own cleaning directions where they’re available.
Sources
- How to remove stains and scuffs from painted surfaces (Advance Painting)
- How to remove scuff marks from walls without damaging the paint (D and G Flooring)
- How to clean painted walls (Sherwin-Williams)
